Thursday, September 30, 2010

BUSSTR Frame Lock Bead Blasted


When I came up with this folder some time ago I decided after doing several runs of them in liner locks that I wanted to do some frame locks in this pattern also. I wanted to do some blades of my own in thicker stock than the original BUSSTR models using those thin blades from Ragweed Forge. This is one of those blades. I selected 12C27 steel for the blade and had it heat treated by Peters Heat Treat Service.  This is a fine shape for field work too and with the sturdy frame built in .135" titanium slabs with some texturing for making it grippy its the cats meow for an outdoor everyday carry knife. This blade has a nice hollow grind on it and is ready for some work.

This folder weighs in at 3.5 ounces, is 4 and 9/16" closed and sports a 3 and 1/4" blade length open and fancy threaded stand off spacers in the rear to gap it just right. This piece runs $350 and is sold. Thanks Zeke and thanks to all for stopping by to visit my blogger.  

STR

Wednesday, September 29, 2010

One Off Pocket Clips


Every now and then I get asked to do a custom pocket clip application for a folder. Most of these are your everyday run of the mill jobs like just remaking an original pocket clip design for a production folder. In a lot of cases its one that is no longer made by the company they bought it from so when the owner of knife loses or breaks the original clip and needs a new one they'll touch base with me or someone that is also capable of doing it and get one that way to replace the one that broke. Some of the companies like Spyderco and Kershaw as well as a few others have told the customers about me letting them know where to look to get in touch with me. Thats pretty cool actually but anyway, these are kind of unique as opposed to others I do so I thought I'd post em up.

In this case the owner of these knives, both of which are fairly nice production folders, wanted specific needs met for his knives and included some hand drawings of his ideas to give me something to go by. I have some margin for artistic license on most of these and even though thats the case I try real hard to make them as they owners imagine. These came out pretty good I think.

Anyway, thanks for looking.

STR

He-Man Wharny in 12C27


Seen here is the newest one up. This is the last one of the He-Man folders I had on the agenda to get knocked out. Last pic shows what I have left of all I've built lately. Both hunters and both Japanese White steel models are gone and this here Wharncliffe model is for my son who wanted to get one of my knives for his future father in law. This one has a screw down stop pin as opposed to a shoulder type pin and the spacers are plain type straight forward designs instead of milled out on a lathe. Like the others its just over 3" for blade length, about 3 ounces for weight and between 4 and a 1/4" to 4 and 3/8" closed. I bead blasted the entire thing, blade and all and I installed one of my low rider clips on this one. It will be on the way to my son, Brandon here shortly.

Thanks for looking.

Tuesday, September 28, 2010

He-Man Hunter and He-Man Hawkbill


Two more in my spurt of knife making just up. I actually have a third one I did as well but its needing some adjustment on the contact before it will be ready so I just stuck with the two completed. Once more these are the same pattern with various blade shapes I've come up with to fit into the same handle shape. I tend to like more traditional straight forward designs as opposed to all the fancy smancy curves and grip grooves. To me a straight forward more "Puukko" type handle is more versatile in a multitude of grips making the knife about as easy to use flipped on its side as it is upside down or right side up.

Anyway, this handle appealed to me years ago when I saw a drawing my good friend Dirk Potgieter had done and at first the model I made was similar to the one he did but as things progressed little by little I eventually modified it so much that it is hard to tell its the same general pattern anymore. Hence the He-Man name sake. This one is a very similar knife to the one I used to call my "Ouparator" with some slight improvements to it in how I build it.

The He-Man name comes from the lock which is pretty stout on most of these because all my He Man models come in .095 thickness titanium with very shallow lock cuts to spring the locks or none at all depending on what is ordered. Its a very stout lock and something certainly not for everyone but the trade off is a knife that can be carried without a pocket clip or worry of hyper extending the lock out the wrong way when closing it. It requires a lot of ummmph and a lever to make the bend in this lock so there is no way a thumb is going to change the memory of one once its set believe me. I've got a stout thumb and I can't cause the lock to lose spring memory with my thumb on purpose let alone by accident! :-)

There are other trade offs also. One is it may take a bit more to close one of these locks with no lock cut to spring it easier but the benefit of that is it won't close by accident on you when you have to focus your attention on one to make it close when you want it to. The other is that the lock has so much spring to it that you are not going to be sitting around opening and closing one of these all day like some kind of a knife worry stone nervous habit. I mean you can try but likely it will flat wear your thumb out so its the kind of knife you open when you need it and you use it and put it away. 

Anyway, these again both weigh close to 3 ounces each. Both are 12C27 blade steel heat treated to 60 Rockwell by Peters Heat Treat Service. They are 4 and 1/4" long closed, with slightly over 3 " blade lengths open. The pics say it all as they both stand on some logs out back together. I did both of these once again in the same .095 thickness titanium slab handles and neither one of these has a lock cut in the lock. The locks are solid just like they come and they are some stout locks. Not for everyone I know but for someone wanting a totally unique lock unlike any you'll fine anywhere else well, you are looking at it.

I'm starting to see a pattern here with hunters. It appears that they like carrying deep without pocket clips. You probably noticed that this hunter model, just like the last does not have a clip. The hawkbill however, did get one of my custom made ti low rider clips on it for right hand tip up carry.

The Hawkbill folder shown here is available yet. $250 Correction: This one is SOLD
Thanks for looking. Been a busy few days for me. I'm taking a break. :-)

STR

Sunday, September 26, 2010

He-Man Hunter No Pocket Clip, Titanium screws


This one just up. I had this one sold before I started it. The request was for a hunter outdoorsman blade for field use but a folder built with titanium screws. As requested thats what I did. I kind of took the liberty to make it without a pocket clip. This gent that ordered it is a repeat customer and a friend of mine and has never used a clip on any of the knives I've worked on to repair for him so I'm assuming he won't be using one on this folder either.

This He-Man weighs 2.9 ounces as shown. The titanium slabs are .095 thick on each side and the blade is 3 and 1/8" long and the closed length is 4 and 3/8". The lock is sprung solid with absolutely no lock cut in it at all in the rear to make bending it easier. This is as requested by the customer who specifically asked to get one of my He-Man folders done this way. As most that follow my work know I started the He-Man model and it got its name just from doing this. Its a real advantage having a lock sprung solid like this when you have no clip as a back up stop to prevent hyper extension of the lock. It takes a tool and lots of muscle to even make the bend in this lock at .095 thickness so there is no way a thumb is going to cause it to lose spring tension. Trust me it would take a lot more than a thumb to do that.

This one is also 12C27 blade steel, and also heat treated by Peters heat treat to 60 Rockwell hardness just like the one posted yesterday in the He-Man Wharncliffe. The blade is also hollow ground just like the one yesterday but this one has a higher grind. Its built much like the others but still unique enough to call it one of a kind. I used two washers per side on this one also, and it also sports a 2mm detent ball for the lock. Fancy stand off threaded spacers are used in back held in place by phillips head titanium screws that were quite surprisingly costly!

Someone asked me last night why I run the edges clear back on some of these. My answer is that it is a use and function thing as opposed to looks. I realize that it can look a bit better if I stop the edge and leave the distinct grind line out there in front where it can be seen like I have done on other models but the truth of the matter is when I'm cutting open bags or poking my knives clear through something I wish to cut open that back unsharpened part of the blade pops through and then the blade snags getting hung up instead of cutting. I've had this issue with some production knives also and honestly it just pisses me off. So my solution, again thinking function and use, was to simply run the edge all the way back making it full length or pretty close to full length edges so the blade simply can't get hung like that from a kick that hangs down with a little hook like some do. It works so I repeated it on several of my knives and feel its worth having at least one model with some blades done this way. My deal is that a knife has to work first and foremost. It can look good doing that and thats fine but truth be told even if it cost someone a thousand bucks, if the lock can't be trusted or the blade doesn't make short work of jobs its no better to me than a wrench that won't turn a nut!

Anyway this one is special ordered by Mike for life in the Louisiana Bayou where it will see salt water marshes and lots of game. I figure like all the knives my friend Mike uses that it will be flat out worked to death to skin and field dress anything from white tail deer to alligators and all in between in no time flat. You'll have to excuse the marks staining the sides on this one. I was playing with it some before snapping these pics. I actually wiped it off and thought I cleaned it pretty well before going out to take these pictures but apparently my eyes ain't what they used to be. :-) Thanks for looking

STR

Saturday, September 25, 2010

He-Man Wharncliffe Frame Lock in 12C27 Blade Steel


As is typical of me I tend to work in spurts. I may go months without making a single folding knife and then suddenly back to back knock out record amounts of work when the mood strikes. I've always told people I'm a very moody maker. Thats so true and in the past when I've tried to force the mood was when accidents happened or I screwed things up. I'm not sure why this is the case but its been the story of my life regarding how I work to make my knives. As is typical of artists in general I also prefer to "paint my own pictures" (read make knives for myself) building them as they come out almost letting the knife decide how it will be rather than taking custom orders making things a particular way from a stead fast plan. In other words I'm more comfortable and things seem to flow better when I'm making what I make without a preconceived plan than making an order specifically done to certain specs for someone wanting it. I've done the custom order thing don't get me wrong, I just prefer not to and try to avoid doing it. Fortunately I have little trouble selling a knife if I want to so until I have to do it otherwise I figure I'll just keep doing things this way at my own pace in my own time.

This knife is one of those that just kind of went together on it's own and with no preconceived notion for which way I was going to go, what blade shape I was going to use or what hardware I'd select for how I would final assemble it. It may look like some of these others but believe me all of them are unique and different. This folder here is sporting a blade in a Wharncliffe shape in 12C27 blade steel hardened by Peters Heat Treat service to 60 Rockwell. I've used threaded fancy stand offs in the rear that I purchased from Knifekits.com, a 3/16" pivot barrel and screws from Tracy at USA knifemaker supply and spline type flat head screws from Sheffield Supply to secure those rear stand off spacers. Also I opted to use two washers per side on the blade mixing teflon with PB type washers both of which were bought at Jantz supply. It took two each side to match the thickness of the blade with the stand offs and with the shoulder stop pin also from Knifekits, in place for the blade to butt against when opened and closed. The result of these washers is a surprisingly smooth opening folder. Honestly I'm quite amazed at how slick the blade just rolls out there and I must say it appears two washers per side have reduced friction tremendously! I also used a 2mm size ball bearing in the lock on this one and a grooved thumb stud. The final touch was a custom made titanium standard style pocket clip mounted for tip up right hand carry. Lastly, this model weighs in at 3.1 ounces and sports a 3.125" blade and is 4.25" closed. Thanks for looking.


This folder is available currently. $275 Pay Pal preferred Money order also. This folder is SOLD thanks
STR


Friday, September 24, 2010

V Grind Japanese Kiridashi He-Man Frame Lock


Seen here is the first true V grind model of the Kiridashi blade that I've bought from Japanese Woodworker. Again these are sold as folding craft knives and I won't get into why I like converting them to something a little more user friendly again. Thats covered in the other threads. Anyway, this is done and working but its needing a good break in and its been a bit of a learning curve to work out how to get a decent action since the detent ball in the lock is rolling over hammer marks on this blade compared to the ones I've done in the past that I had not run into this on. Its a bit of a trick to make differentially heat treated blades work in a folder anyway you cut it but I've done it several times now. The hammer marks go back further on these double bevel blades too so that didn't help. Its a bit of a bumpy ride as the ball bearing works a trail on the blade but its smoothing out little by little with use. In an effort to make it less noticed I used a 2mm size ball bearing in the lock after a friend gave me the idea that it worked to use bigger tires when rolling over rough terrain. So on this one as opposed to a 1/16" ball like I normally use I bumped up the size. It has helped some too. I've used double washers on each side to reduce some friction in the action and I am running that dry for the time being to break it in faster.

I figure I'll leave this one for a couple of weeks to see how it goes and if its still not as smooth as I like I may have to cut some deeper more profound lock cuts into the lock to ease up on the pressure the lock exerts on the blade as its rolling open and closed. This is something I hope is not necessary as I really prefer to make the locks as stout as possible with as minimal a lock cut as I can get away with. With this one however, the detent ball will call the shots as to what I do down the road. Otherwise what a blade! I really like the V grind model and I think overall performance will be more in line with what I've grown used to all my life in the normal style edges I carry. I sliced some with the blade last night using it on some hard wood and wow what a great blade! It slices like a dream reminding me of some of the better Scandi grind blades I've used! Of course they all do work well from Japan Wood Worker but this one is particularly satisfying since it is a true V grind as opposed to the one side grind models and I so love the look of the hammer forging marks on both sides of the blade. On this model I did include a low rider clip for right hand tip up carry. Some of these pics came out a bit blurred. Sorry it was getting darker by the second and by the time I got em loaded on the computer well, it was too late to take more and they show the knife well enough to make out the general details. This folder is sold. Thanks for looking.


STR

Wednesday, September 15, 2010

Japanese White Steel Kiridashi Frame Lock


I guess posting those old jobs I did using the Kiridashi white steel blades from Japan Wood Worker got to me the other day because after pulling those old photos up and going over them I could never stop thinking about them. I knew when I pulled those old jobs out that I had done some neat stuff in the past but this one involving the Japan Wood Worker Kiridashi White Steel blade was one of the ones I really thought stood out to me as one of the neater things I got myself into. I guess its just blending the old world craftsmanship and hammer forged blades with modern style folder building that appeals to me but it may also be related to just how well these blades perform. They cut like a dream and can get incredibly sharp. At 64 Rockwell hardness they tend to keep the edge a while too so thats always good. I tried initially to just buy or trade to get the first one I did back from the customer that bought it from me after he confirmed he still had it but he respectfully declined after thinking it over for a couple days and told me he did not wish to let it go. I guess I should be thrilled that a customer loves my work enough to hang on to it rather than sell it, even if its back to me but fortunately for my situation I had other options! :-) Like I'd actually get to keep and use anything of my own for any length of time! :-)

Anyway, this here knife is the last of the three Japan Wood Worker knives I bought and as you may notice looking it over this one is a left hand grind whereas the other two are right hand grind models. All of these traditional craft knives are one side grind blades but don't let that fool you. Just like the Emerson folders which are also chisel grinds in a lot of cases and always on the edge, they sure do cut and come lethal sharp! Japan Wood Worker makes right or left handed ones so I tried some of each when I bought them. This one being the left over that no one was interested in when I was making them, just sat in an ammo can for the last four years or more until today when I got it out and went out to the shop with the factory version of this folder to revamp it into a frame lock folder too! Unlike the other two posted the other day that were built back in 2006 this one is done in titanium slabs on both sides. And instead of a spacer of micarta or G10 in the rear I used fancy stand offs in the rear on this one, and equipped the blade with phosphorus bronze washers, a fancy thumb stud and an early lock up.

This folder weighs in at 3 ounces for weight making it a great choice for everyday carry. The slabs are .095 thickness each side compared to .125 for those first ones and the pivot is 3/16 on this one compared to 1/8" on the last ones. The blade is 3.125" when opened for this Kiridashi folder and it has a closed length of 4 and 3/8". As you can see I equppped this one with a standard style custom made titanium pocket clip for tip up carry rather than a low rider. Its kind of funny I guess that I make a ton of low rider clips for users knives but when it comes to what I use for myself I seem to like the standard style better and since this folder is mine I set it up as I liked. :-) As always you can click any picture here to fully enlarge it for a better zoom in of the details. The sun was going down some when I took these so I hope they show up okay for folks. Check back later because I just learned that Japan Woodworker is now offering these in a true double bevel grind so one side is not flat. I've purchased three of them and plan on another folder conversion in the near future. This one is sold.   Thanks for stopping by.
STR

Tuesday, September 7, 2010

Lockback from a fixed blade


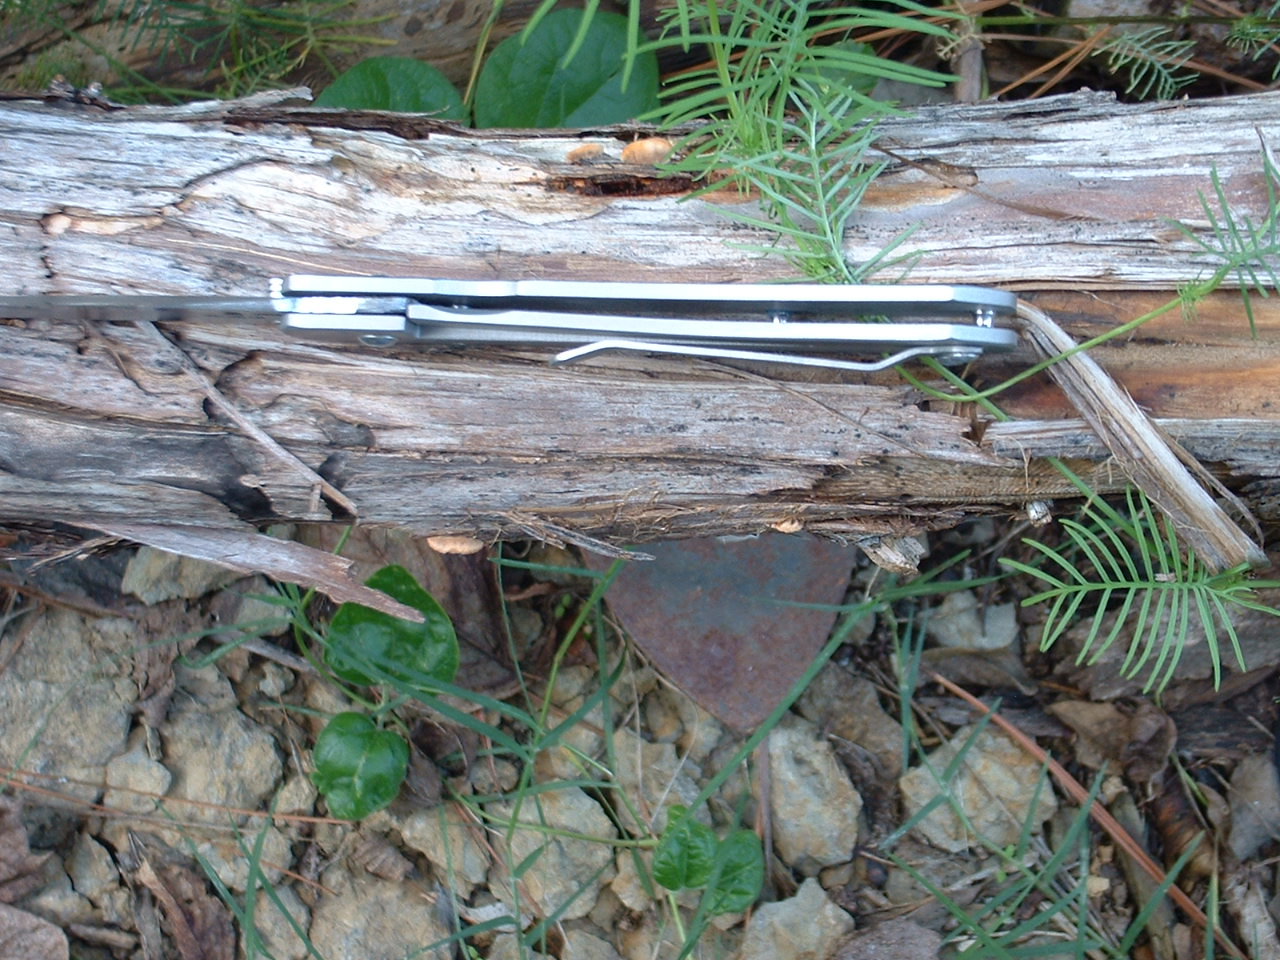
After building that folder for Dirk (Oupa) I got the itch to do another for myself. So speaking with Bob on the phone I bought me a blank from him as well and decided to do my folder in a lockback instead of a frame or liner lock like I did for Dirk. It was a lot of grinding to do this with a blade already hardened let me tell you and I don't recommend it for just anyone particularly if you have to grind out a small part like this rocker arm/lockbar shown in the drawing before I got started. I'm a glutton for punishment at times but it was doable, just not something I'd make a habit of doing a lot you know? Hardened steel work is so time consuming.

Knowing what I know now, if I could pick between working hardened steel and unhardened I'd go unhardened every time! Looking back on this since it took place years ago, I'd have to say that it was really not the smartest way to build a folder. I stick this and these other older jobs here as a memento of past jobs to have a place to store them only. Anyway, its much easier to grind your own blade from bar stock that is not heat treated yet and its far easier to drill holes to install thumb studs or add traction grooves before hardening and thats the way I'd suggest doing it instead of attempting to do this type project with a blank already hardened. Still, many manufacturers grind their blades hard and some do prefer that so its not impossible to work already hardened stock. If I had any sense at all I'd stick with doing things easier but as I always said I never did do things by the book so this here project was no exception. In the end it still put a 'Dozier' folder in my pocket for a lot less money than if I had bought one from Bob that he made so in that respect it was a good thing.

Again, you can follow progress on this old project from start to finish albeit a summarized visual of the actual events that led to this folder in the final picture. The green G10 started out on a sheet and of course I had to design my handle, trace those and cut them out, then mark my holes in the proper spots to drill them out, cut the hardware to size and fit it all together so the lockbar and blade mated together properly and after making a custom titanium spring holder and titanium spring for the locbar/rocker arm assembly, which had to be properly bent to spring it, I had to then make all that come together to work. Obviously I've left all that out or we'd be here all day.

Once I got those parts fitted though, the lock up was rock solid, and it is still like that to this day. The lockbar sinks nice and deep also and in the end the folder was a nice mid type locking folder with good snap to the blade. I stuck some very very thin PB washers in the pivot but not before using my flat platten and a super fine belt to take some of the thickness of the blade down about .005 in thickness. This allowed my washers (snagged from a rebuilt Spyderco I did years ago) to fit better by making the blade slightly thinner than my lock bar. Then I made a custom titanium low rider clip to fit it for tip up carry to complete the package. After carrying this one for a few I finally gave it to my brother in law who has always had a fondness for Bob's D2 blades. He still carries it to this day and truly loves it based on the feedback I've received from him. My guess is that this folder has seen its fair share of white tail deer now that its been out there hunting in West Virginia with my Brother in law. Thanks for looking.
STR